In the power-tool industry, DeWalt is a popular name. For many years, DeWalt has been present in this industry and providing quality tools to their customers.
Due to their promise to provide a quality product, the reputation and popularity of DeWalt products are an increasing trend among professionals and DIY lovers.
If anyone is making a list of quality tool brands without DeWalt, the list will be incomplete.
However, in this article, I am not going to praise DeWalt and its products. It is a guide to let you understand how to change a DeWalt chop saw blade.
You may think this guideline is for DeWalt users only, but that is not the case. The chop saw blade changing procedure would remain the same for other manufacturers. All in all, you can say it is a universal guideline. And undoubtedly the right guideline for DeWalt chop saw owners.
The Procedure of Taking the Head Aside from the Machine
Before going to the final process, some things you need to take aside. Below are the steps that will show you how to change a chop saw blade.
Taking the Shroud off
The first thing that needs to be done is to take the shroud off. You may think this step is unnecessary, and without this step, you can complete the full process. But it is strongly advisable not to skip this process. Because in the next steps, you may face possible inconveniences.
The full procedure is pretty straightforward. All you need to do is, look for the screws that are holding the shroud and unscrew them.
You may find one or more than one screw based on the model.
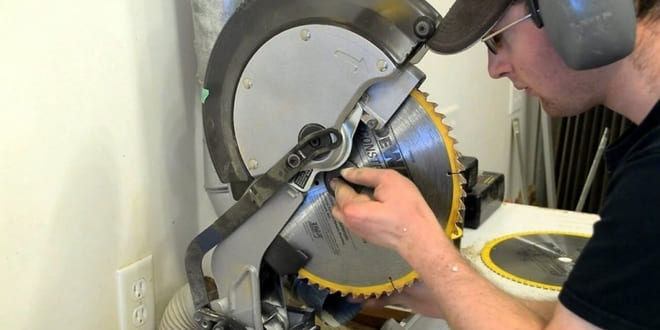
Blade Demounting
Once the shroud is taken off, then you can easily unscrew the balance screws that are holding the blade in its place. While unscrewing, you don’t need to follow any order of unscrewing. But I am advising you to unscrew the screw, which is supporting the blade. In the end, you will have the final screw that goes over the blade.
Most up-to-date tools have an index that is placed parallel to the disc. It looks like a small button, and the responsibility of this button is to prevent the axis from rotating and consequently unscrewing itself too. It is significantly essential to find the index and press the button down before unscrewing the blade.
The majority of the time, it will come out without any concern. If you face any problem, don’t try to fix it by pressuring because whatever you will do, it will not work. If you provide more pressure to the machine than its requirement, the balance of the whole unit will be damaged.
The most natural solution is if you face any problem while blade demounting, apply lubricant to the machine.
Installation of the New Blade
The installation process is also not a complicated one. You have done the process already; only you need to follow the reverse process.
Unwrap the new disc and place it on the axis. While setting it, put the disc parallel to the index, and it should be 90° angle. If the disc gets slightly off, worrying is unnecessary. Once you screw it correctly, the disc will be leveled precisely.
Also, the disc should not be tightened too much. If you do so, the RPM and balance of the machine will be affected.
Don’t be Unaware of the Below-Discussed Things
- Whenever you are going to work with a power tool, don’t forget to unplug the power source. You may find this advice common sense. Unfortunately, many people forget to do this. Needless to inform you, you should not play or change or adjust anything in a LIVE machine. It is a great risk to your life.
- When you are tightening the arbor and displacing or placing the blade into its position, make sure you have worn hand gloves. It is mandatory to follow because the disc is exceptionally sharp. To eliminate any injury, there is no other choice except to wear hand gloves.
- Don’t forget to inspect the principal bolt and the tightness that you are providing to it. Generally, many people give a hand screw while tightening. Also, some forget to tighten the axis properly. If you forget to give a well-tightened, you will lead yourself to serious injury because of imbalanced RPM.
- Before you plug the machine into a power source, ensure all levers, pins, screws, and knobs are well-tightened and secured.
Possible Problems and Explanations
- One of the most common problems that people face is faulty bolts and screws. In case if your tool remains unused for many days, the bolt and screw may get rusty. So, when you are screwing or unscrewing, you may face problems in accomplishing it. As I already stated, in that case, the lubricant will be the right solution. Besides, tantalizing grease or any other greasy product will also be helpful.
- Another problem is vibrating. It happens when you are providing much space between the nut and the blade. The spacing should be less to avoid any vibration. In general, words, if you ever find the edges are not tightened well, give a look at the issue without delay. To solve the problem, turn off the machine and unplug it from the power source. Re-do the whole procedure again. Remember not to take any risks. Doing things correctly can save you from any unwanted situation.
Final Words
Undoubtedly, the whole procedure is pretty simple. But you can’t lose focus and attention while changing a DeWalt chop saw blade.
Also, it is unnecessary to be a professional to change the blade. A minimum level of experience will assist you in avoiding many problems that you will face during the operation.
The truth is, anybody can do this operation with proper care after reading the full instruction. Confirm all the safety precautions without missing them. And always purchase a quality blade because, without a quality blade, you can’t perform an efficient operation.